This is a collaborative post written by Jaci Wilkinson, Head, Discovery and User Experience (DUX), and Alexis Guilbault, the Web Content Assistant in DUX.
Accessibility is a critical component of equitable, usable web content creation. There are many steps people who manage websites, social media accounts, and blogs can take to structure content for the benefit of all readers. Creators need to ensure their content is compatible with assistive technologies such as screen readers that “speak” webpages and other online information to blind readers.
In late April 2019, the DUX department audited 47 posts from IU Libraries blogs and assessed the use of three key accessibility practices. This post highlight the results and explains these three practices:
- embedding videos with closed captioning,
- strategizing content organization with heading tags, and
- providing descriptive captions and/or alternative text for images.
As a result of this review, we’re rolling out definitive guidelines in these three areas that we ask blog creators to follow for content created in WordPress moving forward.
Videos and closed captioning
Closed captions provide text and additional interpretive information for viewers who are hearing impaired and are also helpful to viewers who do not speak English.
While only 6 of the 47 IU Libraries blog posts had videos, 2 of the 6 did not have closed captioning available. Embedded videos need closed captioning available in the video player.
How to make embedded videos accessible
First, only embed videos that have closed captioning available. Check if a video has closed captioning by checking the “CC” button in the video player. If you make your own video and upload it to YouTube (0r another service like Vimeo), be sure to add closed captions.
For now, we cannot auto-enable closed captioning on WordPress. However, if you upload your own video to YouTube, you can auto-enable closed captioning through the Video Manager.
Headings
Content organization is critical to any work on the web, and headings play a central role in how users with and without screen readers engage with our work. Skimming is made possible for all users when headings with heading tags are used. A heading tag is a small piece of HTML code that differentiates headings and sub-headings from the rest of your content and give your blog post structure.
Screen readers preview headings with heading tags at the start of each article, ignoring text that is bolded or a larger font size. Thus, with the use of heading tags, more users are able to preview content and skim sections.
For example, look at the structure of this post. It is made more readable by use of two heading sizes. Each of the three practices we’re highlighting in this post starts with an explanation section. Then, a smaller heading distinguishes the “How to” portion of each practice.
On IU Libraries blogs, only 6 of the 47 blogs used headings. Only 2 posts using heading tags, and the other 4 bolded the text to make it appear like a heading. Headings are important to insert as signposts for readers and should indicate what a paragraph or as section is about. As mentioned above, they also facilitate skimming, allowing a user to get to the content they are looking for as efficiently as possible.
How to insert heading tags
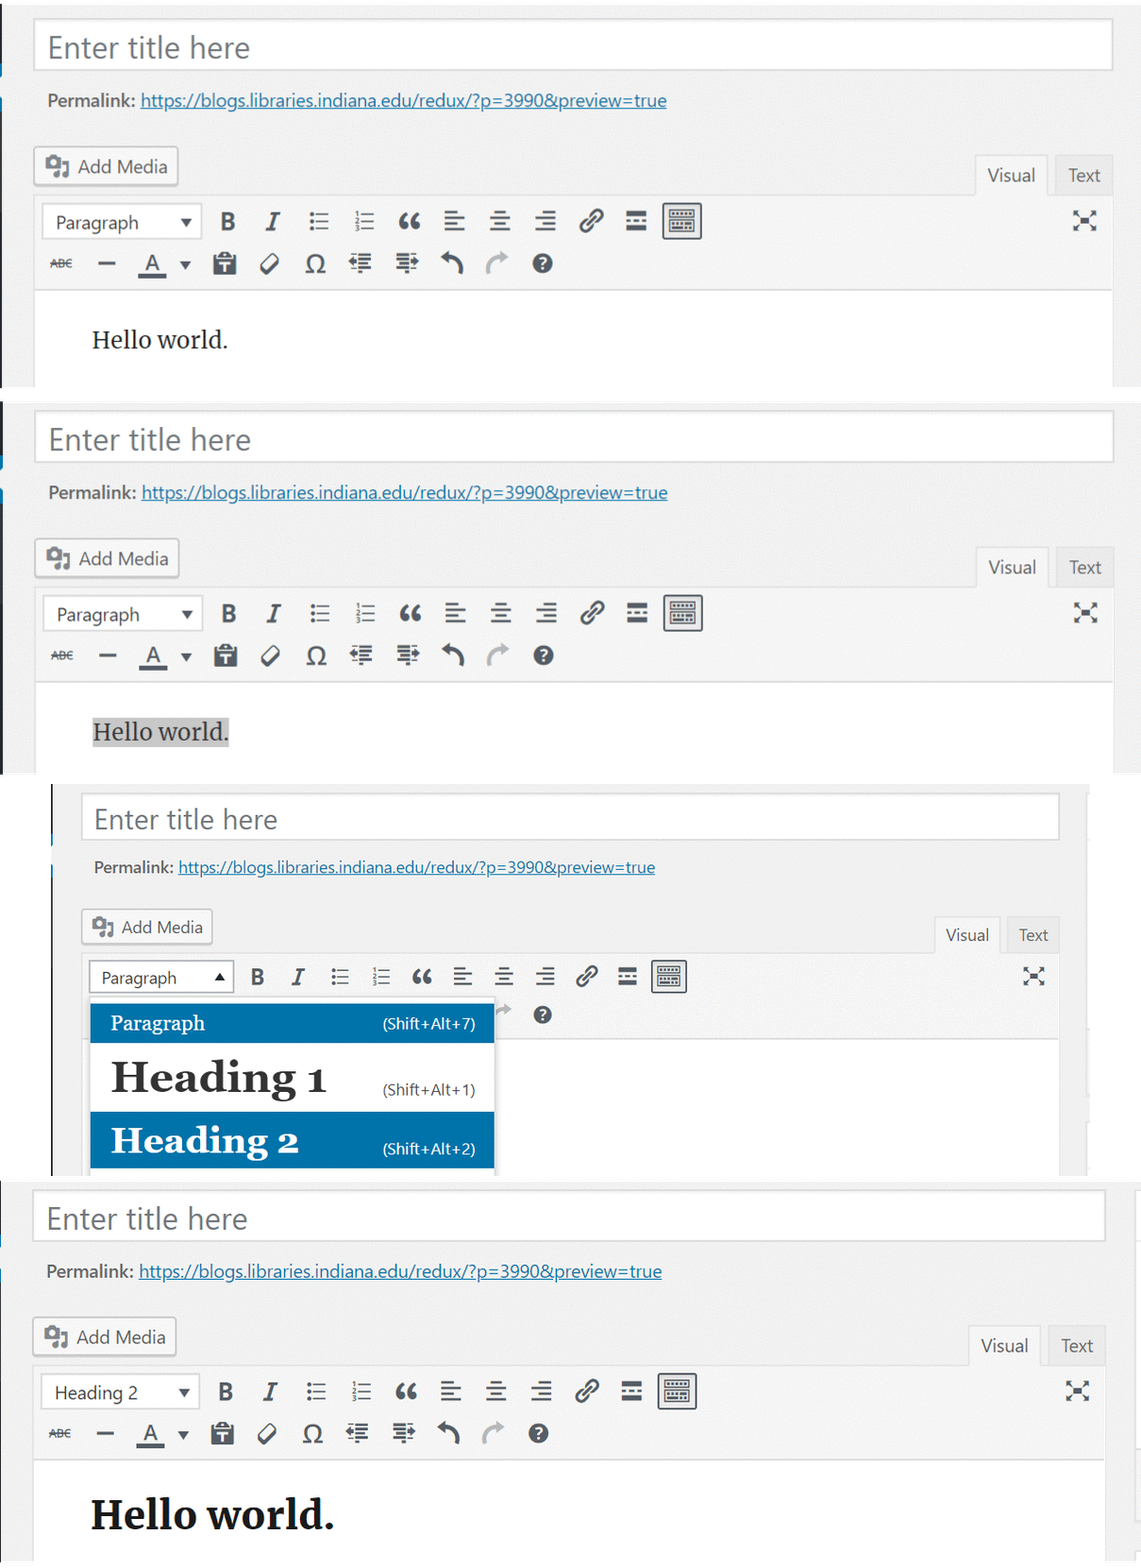
To insert heading tags, first select the text you want to make a heading. Then, click on the drop-down menu with “Paragraph,” and select the numerical heading tag you want to add. This will add the heading tags to your post. You can see them in the “Text” tab, next to “Visual” in the GIF below. For example, for the heading below, the code would read <h2> Hello world. </h2>.

There are six sizes of heading tags, beginning with <h1>and ending with <h6>. H1 is usually reserved for blog titles. H2 tags are used to create sections within your blog post, and H3 tags allow for easier navigation within those sections. You use heading tags in numerical order. For example, you would use H4 for creating sub sections under a section that was headed with H3.
Alternative text and captions
Alt text, or alternative text, allows screen-reading tools to describe images for users with visual impairments. Web content creators must add descriptive, useful alt text when uploading images for blog posts. Descriptive captions can take the place of alt text. Images that are mostly text, like an infographic or a poem, should include a “text version” for screen readers within the body of the blog post.
30 out of the 47 IU Libraries blogs consulted (64%) had issues with image accessibility. Some posts did not have any descriptions of images for screen readers, while some had vague captions that did not accurately communicate what is pictured.
How to add alt text and captions
To add alternative text to images or GIFS, like the one included above, click on the media you have added to your post and select the pencil or “Edit” button. Here, you will be able to add alternative text and/or a caption.
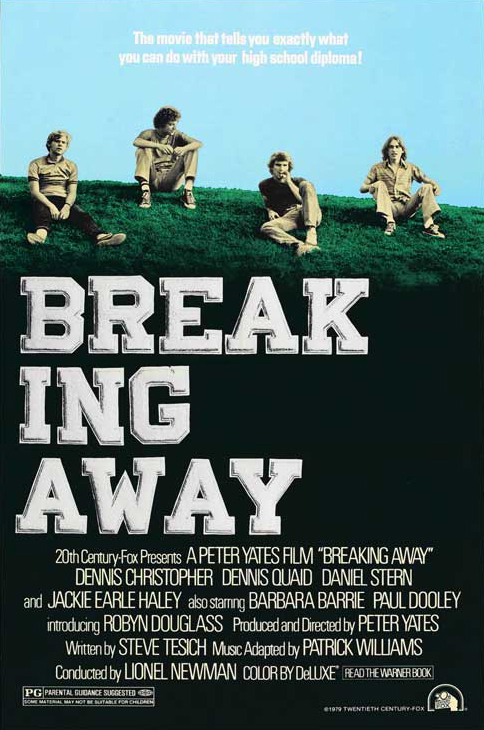
Remember that captions and alt text should not repeat information directly from the text, but, instead, should describe what the image is and what the viewer is able to see. For example, let’s say we wrote a post about the legacy of the Bloomington-classic Breaking Away. We might include this image of the movie poster.

This caption describes what the image is, a movie poster, while indicating it is for the movie we are writing about, the year it was made, and the source of the image; however, it doesn’t describe what is in the image itself. To make this a better “descriptive” caption, we could add this in the alt text: “Breaking Away Movie Poster from 1979 courtesy IMDb. The poster depicts four young men sitting on a grassy hill with the quote ‘The movie that tells you exactly what you can do with your high school diploma’ above them in the sky.” This caption describes what the image is and gives the reader a sense of what the poster looks like.
A note on WHO authors blog posts
Student work is critical to the services and resources we provide. A student worker primarily wrote this blog post! But unfortunately, our blog audit showed that many posts written by students or temporary employees were less accessible than other posts. Please educate all blog creators about how to create accessible content. (Hint: this post is a great way to do it!) This is a skill they can tout in their next job interview.
Accessibility is usability
By ensuring embedded videos have closed captioning, organizing blog posts with headings, and providing alternative text or descriptive captions for images, we can make IU Libraries Blogs more usable for all viewers. At some point, the practices outlined here will likely be compiled into a larger accessibility policy or practices document that will cover more than just library blogs. If or when that happens, this post will be updated to provide links to any new documentation.
If you have questions about the methods featured here or want to learn about other ways to make your web content more accessible, email DUX department head, Jaci Wilkinson, at wilkinj @ iu . edu. She also welcomes your feedback about these guidelines.
Leave a Reply